Subject/Grade: Physical Education - Grade 2 Lesson Title: TAG, TAG, TAG! Teacher: Hope Brenner & Hailey Sills
Stage 1: Identify Desired Results
Outcome(s):
2.8 Strategies and Skills Apply a repertoire of strategies and skills, with guidance, for and through active participation in a variety of movement activities including:
Key Understandings: (‘I Can’ statements)
Prerequisite Learning:
Instructional Strategies:The first instructional strategy we are using for this lesson is Direct Teaching, “Teachers tell the students the concept or skill to be learned and then lead them through instructional activities designed to result in student learning” (Mongan-Rallis, 2004). We chose direct teaching because the teachers will tell the students what specific body movements need to be completed during the warm-up activity.
The second instructional strategy we are using for this lesson is experiential. “Experiential learning is, quite simply, learning by doing….an active process which engages the learner, not a passive process that happens to the learner” (MTa Learning, n.d.).
Stage 2: Determine Evidence for Assessing Learning
Formative Assessment: We are using formative assessment through observation of the lesson. We are observing how the students are applying their knowledge of proper movement skills throughout the activities. We want to see how the students are able to adjust their speed while playing tag-games. We also want to observe how the students are using effective strategies to avoid being tagged and tagging others and in safe and appropriate ways. It is important for students to use active listening throughout the lesson.
Stage 3: Build a Learning Plan
Set (Engagement): Time: 10 Minutes
Good Morning/Afternoon grade 2’s, today we are going to be playing a new version of TAG. We are very excited to get started with today’s lesson!
Before we get started with the main activity, we are going to do a ‘Follow the Teacher’ activity.
REPEAT…. The teacher says STOP!!! Touch the wall closest to you.
Examples of movements:
Now that our bodies are warmed up, we are going to move on to the main game of today’s lesson. The Tag game we will play is called ‘Doctor Vs. Germs’.
The teachers will pick 3 students to wear the jerseys (green pinnies) and they will be the germs. They will pick 2 students to be the doctors (blue pinnies). The rest of the class will be citizens.
Learning Closure: Time: 5 Minutes
To cool down from that fun and intense game of ‘Doctor vs. Germs’, we will all walk in a large circle around the gym doing big arm circles, little arm circles, rolling our necks side to side, walking on tippy toes, reaching our arms high up to the sky and low to the ground and lastly taking really BIG steps around the circle.
Once the students are cooled down, the teacher will ask the students if they enjoyed today’s activity? Was it fun learning a new game to play?
Materials/Resources
Possible Adaptations/
Differentiation:
Management Strategies:
Stage 1: Identify Desired Results
Outcome(s):
2.8 Strategies and Skills Apply a repertoire of strategies and skills, with guidance, for and through active participation in a variety of movement activities including:
- Low-organizational, cooperative, and attentive games involving locomotor and non-locomotor skills (e.g., tag games, follow-the-leader, fox and geese, parachute play, hopscotch)
- Describe and incorporate strategies for a play that will support a deeper understanding of, and engagement in, specified movement activities (e.g., tag games - move into open spaces, hide behind other people, move only when the ‘it’ person is getting close)
- Use movement skills, rules, and basic strategies to support cooperative participation in a variety of low-organizational games.
Key Understandings: (‘I Can’ statements)
- I can avoid getting tagged.
- I can safely tag others.
- I can control my speed.
- I can be aware of my surroundings.
- I can use good listening skills to follow the teacher and others.
- What are effective strategies to avoid being tagged? Along with tagging others?
- How can I use active listening to follow instructions?
- Why is spatial awareness important?
Prerequisite Learning:
- Prior knowledge of spatial awareness and active listening.
- Prior knowledge of when it is appropriate to change their speed.
- Prior knowledge of safe gameplay (hands-on activities).
Instructional Strategies:The first instructional strategy we are using for this lesson is Direct Teaching, “Teachers tell the students the concept or skill to be learned and then lead them through instructional activities designed to result in student learning” (Mongan-Rallis, 2004). We chose direct teaching because the teachers will tell the students what specific body movements need to be completed during the warm-up activity.
The second instructional strategy we are using for this lesson is experiential. “Experiential learning is, quite simply, learning by doing….an active process which engages the learner, not a passive process that happens to the learner” (MTa Learning, n.d.).
Stage 2: Determine Evidence for Assessing Learning
Formative Assessment: We are using formative assessment through observation of the lesson. We are observing how the students are applying their knowledge of proper movement skills throughout the activities. We want to see how the students are able to adjust their speed while playing tag-games. We also want to observe how the students are using effective strategies to avoid being tagged and tagging others and in safe and appropriate ways. It is important for students to use active listening throughout the lesson.
Stage 3: Build a Learning Plan
Set (Engagement): Time: 10 Minutes
Good Morning/Afternoon grade 2’s, today we are going to be playing a new version of TAG. We are very excited to get started with today’s lesson!
Before we get started with the main activity, we are going to do a ‘Follow the Teacher’ activity.
- Do we all know what ‘Simon Says’ is? Today we are playing a similar game called ‘Follow the Teacher’.
- Very good listening! Now, run around the gym until we (teachers) tell you what else to do.
REPEAT…. The teacher says STOP!!! Touch the wall closest to you.
Examples of movements:
- Gecko (All the students will get on the ground and imitate a gecko).
- Act like a frog.
- 3 high straight jumps.
- Do the bear crawl.
- Skip on the spot.
- Do the crab walk.
Now that our bodies are warmed up, we are going to move on to the main game of today’s lesson. The Tag game we will play is called ‘Doctor Vs. Germs’.
The teachers will pick 3 students to wear the jerseys (green pinnies) and they will be the germs. They will pick 2 students to be the doctors (blue pinnies). The rest of the class will be citizens.
- If a citizen gets tagged by a germ, they must lie down on their backs, kicking their arms and legs until rescued and healed (tagged by a doctor).
- After the doctor heals the citizen, they are allowed to rejoin the game.
- Throughout the game, the teacher will assign different students to act as the doctor and germs for the activity.
Learning Closure: Time: 5 Minutes
To cool down from that fun and intense game of ‘Doctor vs. Germs’, we will all walk in a large circle around the gym doing big arm circles, little arm circles, rolling our necks side to side, walking on tippy toes, reaching our arms high up to the sky and low to the ground and lastly taking really BIG steps around the circle.
Once the students are cooled down, the teacher will ask the students if they enjoyed today’s activity? Was it fun learning a new game to play?
Materials/Resources
- Pinnies (green and blue)
Possible Adaptations/
Differentiation:
- Have more body movements for the set activity.
- For the main development activity, have the same amount of doctors as there were germs.
- Get the students to provide more body movements that they would like to do.
Management Strategies:
- Ensure all the students are participating.
- Explain the activities thoroughly.
- Ask if there are any questions before they begin playing.
- Making sure the students are safely tagging and avoiding being tagged.
- Ensure the students know the boundaries (spatial awareness) of the gymnasium.
- Making sure to watch for the students who have been tagged and are on the floor.
Subject/Grade: Grade Two Physical Education Lesson Title: Moving Skillfully Teacher: Hailey Sills
Stage 1: Identify Desired Results
Established Goals: (Learning outcome)
PE2.3
Explore, express, and apply, a variety of ways to skillfully move the body through space while participating in movement activities, including at a:
- utilization level of skills when:
- walking
- running
- jumping forward and landing
- jumping sideways and landing
- walking
- control level of skill when:
- jumping backward and landing
- hopping (body moves on one foot as in right foot to right foot)
- skipping (combined a step and a hop)
- leaping (body `takes off 'from one foot, propels through air for distance, then lands on the opposite foot)
- sliding (one foot steps and the other moves to meet the first foot, "step-close")
- galloping (one foot steps, body propels upward, other foot moves to meet the first foot)
- rolling forward (see note)
- rolling sideways
- jumping backward and landing
- progressing-towards-control level of skill when:
- rolling backward (see note on page 34).
- rolling backward (see note on page 34).
(g)- Walk and run through obstacle courses (eg, ropes, cones, hoops on the floor) without touching obstacles and improving timed performance with each repeated attempt.
Understandings: (can also be written as ‘I Can’ statements)
Students will understand that….
- I can utilize different movement skills.
- I can control my movement skills in different situations.
- I can progress with each attempt.
- How can you effectively maneuver yourself through the obstacle course?
- How can you control your speed while also avoiding touching the obstacles?
Students will know….
- How to control their movements in certain scenarios.
- When to use appropriate movements, depending on the situation.
- Walk/run through obstacles without touching them.
- Gradually get faster with each attempt through the course.
Instructional Strategies:
- Direct instruction: I will explain to the students what we will be doing for the day, and then I will walk/run through the course I have set up first, to give them an example of what they need to do.
- Experiential instruction: We are experimenting with these obstacle courses, students have never tried them before. So, we will start slow, gradually increasing the difficulty as they find ways to effectively get through the course.
Stage 2: Determine Evidence for Assessing Learning
Formative Assessment: At the end of the activity, students will be required to do a self-assessment or an exit-slip. They will each receive a sticky note and a pen. They will need to write down how they think they did with this activity, or how they can improve.
Stage 3: Build Learning Plan
Set (Engagement): Length of Time: 5 Minutes
“Good morning grade two! Today, we are going to be using our movement skills and applying them to an obstacle course! We will begin by walking through the course, so you know where to go and how to use/avoid each item. Then, we will speed up and try jogging or running through the course. Finally, we will see how well you can work through the course while avoiding the obstacles and monitoring your speed. I will show you how to go through the course first, and then it will be your turn.”
- Obstacle courses are beneficial for students motor skills, coordination and strengthening and balance.
Development: Time: 20 Minutes
- Students will begin by observing me throughout the course. I will explain step by step how they need to go through the course. What obstacles they need to avoid and what items they need to use.
- We will begin the class with a stretching exercise to get the students muscles loose.
- Students will begin the obstacle course by weaving through the pylons that I have set up in the gym.
- The next task is to frog-jump into each of the hula-hoops.
- Next, the students need to pick up the ball at the end of the hula-hoops and attempt to shoot it into the basketball net.
- After that, there will be lines of hockey sticks laid out horizontally and the students need to jump over each one of them until they reach the end.
- For the first attempt students will walk through the course so they can get the hang of it.
- The second attempt will need to be a bit faster.
- Finally, the last attempt is where they need to try their hardest.
Closure: Time: 10 Minutes
- Now that the activity is over, I will have the students complete an exit slip regarding the activity.
- I will give each student a piece of paper and a pen/pencil and have them write their ideas down. After that, they are free to go.
Materials/Resources:
- Pylons
- Hula- hoops
- Hockey sticks
- Skip rope
Possible Adaptations/
Differentiation:
- If we had more time, students could have attempted the course a couple more times.
- We could have done a cool down game at the end of the course.
Management Strategies:
- Observing the students as they go throughout the course.
- Calling out the next steps for the students so they do not forget.
- Encourage them throughout the course.
- Make sure students know how to go through the course properly so they don't hurt themselves.
- Make sure the students are not straining themselves.
- Making sure students are aware of their surroundings.
This is not necessarily a lesson plan, but it is a list of items that you could bring into your everyday classroom to keep students active.
Promoting Play Kit
One way I could make this more interactive for the students is to have them pick the exercise or stretch that they want to do. For example, if I roll a 5, I would call on a student to yell out an exercise or stretch and the entire class will have to do that movement 5 times. I chose this simple item because it is a great way to get students minds and bodies moving! By thinking about different exercises that they want to do, and then completing them based on the number rolled, it gets the brain active for more learning for the rest of the day. This activity can also be done multiple times a day. It is important that students get movement breaks in between classes or subjects so they can keep their brains active (Terada, 2018).
Promoting Play Kit
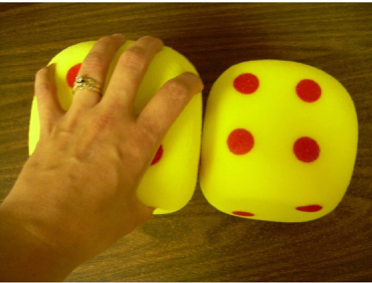
- The first item I have chosen for the promoting play kit is giant foam dice. When it is time for a brain break, or a movement break in the classroom, I would simply get out the giant dice and roll it. Depending on the number that I roll, students will have to do a certain exercise corresponding with the number on the dice.
One way I could make this more interactive for the students is to have them pick the exercise or stretch that they want to do. For example, if I roll a 5, I would call on a student to yell out an exercise or stretch and the entire class will have to do that movement 5 times. I chose this simple item because it is a great way to get students minds and bodies moving! By thinking about different exercises that they want to do, and then completing them based on the number rolled, it gets the brain active for more learning for the rest of the day. This activity can also be done multiple times a day. It is important that students get movement breaks in between classes or subjects so they can keep their brains active (Terada, 2018).
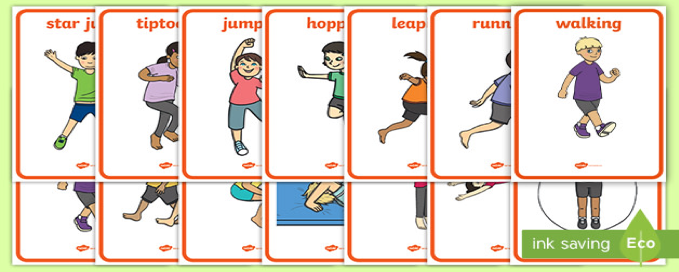
- The second item I have chosen to include in my kit are movement flashcards. Movement flashcards are fairly self-explanatory, the idea is to simply make and laminate a handful of flashcards that have specific movements on them. These movements could be anything, like jump up and down 5 times, or wiggle your body like a worm, etc. The possibilities are truly endless. When it comes time to use them, I would get the classes attention at the front of the room. I will yell out the activity on the card and then give them an example of how it is supposed to look. Then we will continue with that movement until I pick the next one.
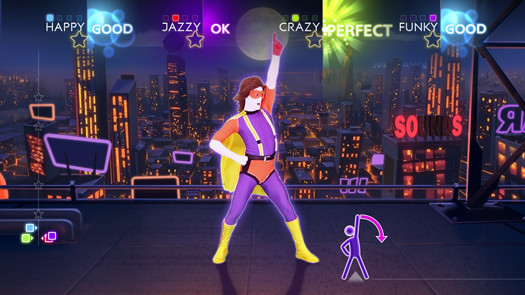
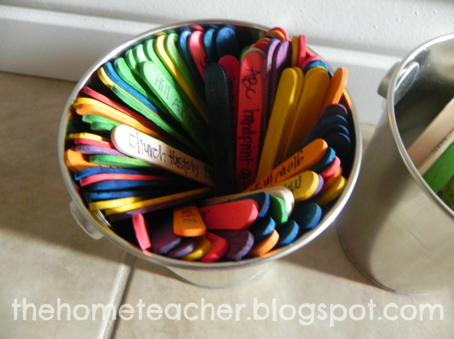
- Assuming I will have a projector of some kind in my future classroom, as most do these days. The third idea I had was to create a bucket with a list of songs from the classic “just dance” game. The songs will be written on popsicle sticks and placed in the bucket. I will ask one student to come up and pick a stick from the bucket, whatever stick they pick is the song I will search up on YouTube for the students and myself to dance along to! I loved just dance as a kid, and I think it is a great, quick and easy way to get kids up and moving and excited about it too. I will supply a YouTube link below of an example of what I am talking about. Of course, I will check all of the songs before putting them in the bucket so I know they are appropriate.
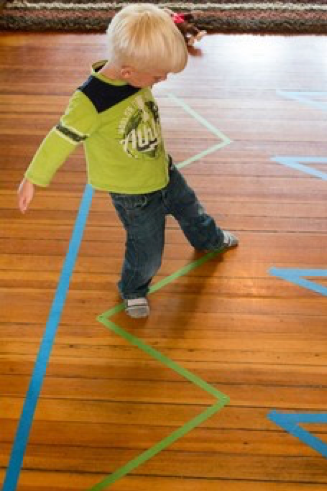
- Another simple item I thought I could include in my kit is tape. Yup, you heard that right, tape! I chose this because I thought it would be fun to lay the tape out all over the classroom creating a ‘tightrope’ obstacle course (Gwen, 2018). Students will all start at the same point in the classroom, when I say go, one at a time they will keep their feet on the tape as they follow the line. If they ‘fall off’ they will have to start over and head to the back of the line. I thought this was a fun activity because it not only gets them up and moving, but they also need to concentrate on keeping their feet on the line. It will also get their adrenaline pumping because they will want to complete the course on the first try instead of starting over and heading to the back of the line. A simple item can turn into something exciting for students!
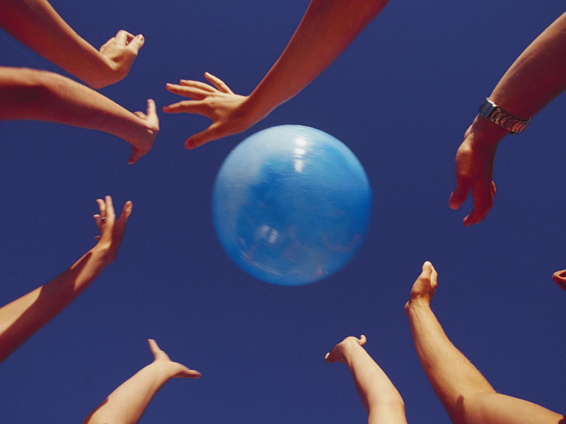
- The last item I would include in my kit is a beach ball! A simple, but fun activity that I definitely remember doing as a kid, was to throw a beach ball into the air and continuously hit it, to see how long we could keep it in the air. We could even have multiple beach balls and split the class into smaller groups to maybe make it more exciting. But this can be done with a whole class as well. I chose this item and activity because it will get the students up and active, get their adrenaline pumping and will help with their concentration as they have to be watching the ball and their surroundings (Gwen, 2018).