|
Hello all, and welcome back to my blog! This is my final learning project post. It has been a journey, that is for sure. I really enjoyed this project and all of the fun things I learned how to do with embroidery. The criteria for this assignment was to learn a new skill, practice it every week and then make blog posts based on our progress. I had started embroidery before this class but I had only done a couple small projects. I hadn't really learned any new skills, just the basics. I started here with my first learning project post. It was a fairly small post, just sharing the first resource that I would be using to begin my journey. It was a YouTube video about the basic stitches for embroidery beginners, which is exactly what I was! My next post was where it all began. I titled it "Project One". In this post I showed my progress embroidery a Volkswagon van with cute flowers on top. For this project I used my basic back stitch that I had learned in my first week and then I incorporated the lazy daisy stitch that I had learned from a YouTube video linked here. The photo below is the final product for that week. I am really happy with the way it turned out! 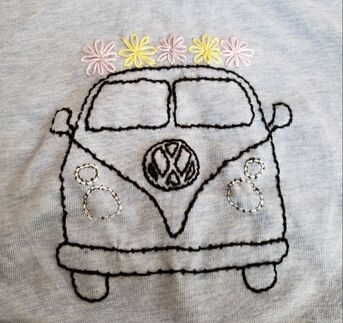 The next project was not as complex as some of my other ones. I will admit I was feeling super overwhelmed that week being in two spring classes and I had a massive assignment due in my other class. But I still wanted to produce something I could talk about for my blog. I titled it "Embroidering Memes". Basically, I had the idea to embroider one of my favorite memes onto a pair of jeans. I did this because the meme is "you're cute jeans" so I thought it would be fitting to put that onto a pair of jeans! I used a simple back stitch for this project, below is the photo of the end result. All of my friends wanted me to do the same thing to their jeans because they are all familiar with the meme as well! 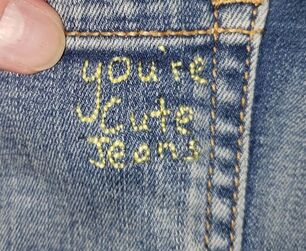 Our next blog post counted as our post for our learning project blog and our regular EDTC 300 blog. We had to use a new technological tool to show our progress in our learning project. I titled it "New Tools, New Embroidery". I had chosen to use Adobe Spark to display my progress for this week. I found it super user friendly, and I made a super cute video to show my embroidery! Below is the video I created for that weeks submission. I used a simple back stitch for the stem of the sunflower, the lazy daisy stitch for the petals themselves and I learned how to do a french knot stitch for the seeds in the middle with this video linked here. My next blog post was my hardest one yet. I struggled so much throughout the week with it that I wanted to quit. I saw a video on TikTok where this girl traced her pattern onto a piece of paper, pinned it to her shirt and then embroidered through the paper so she could follow her design. Once she was done, she wet the paper and peeled it off, revealing her design. I thought it would be a super cool idea for a new project and potentially a new way to embroider! My design looked so good on the paper... until I started peeling it off. All of my stitches became super loose and started detaching. I was so frustrated!!! I started doing research and discovered a specific type of paper that actually dissolves when it comes into contact with water. I immediately ordered it and attempted my design again. The second time around I was a lot more pleased with the outcome. There was only 2 or 3 loose stitches instead of my whole design falling apart. The photos below are both my attempts. The one on the left is the first attempt that I was so disappointed with and the photo on the right was my second attempt. When you look at them side by side you can clearly see which one turned out better!
For my final project I wanted to do something bigger, and more challenging. I also really love Dunkin Donuts so I thought that would be fitting! I found the logo online and bought a plain grey hoody and began. I traced my design onto paper, poked holes through it all along the outline and then pinned it to my shirt. After that, I used a fine tip marker to put dots onto my sweater so I had an outline to follow. Then it was time to start embroidering. I started with the outline, which didn't take too long. The sweater I purchased was really thick material so it was super complicated to poke the needle through. After the outline was completed, I wanted to fill in all the spots with colour, just like the logo. I had to learn how to do what is called a satin stitch and I learned it from a YouTube video linked here. The satin stitch is a hard one to master because you have to make sure you're pulling your floss tight enough that once the stitch is through it stays tight and doesn't become loose. This was extremely time consuming. It took me a full week to complete this project, but I am happy with the final outcome!
This project really encouraged me to keep practicing my embroidery and improve my skills each and every week. I thought it was a really unique idea for a class assignment because I was actually working on something each week that I truly enjoyed. I plan to continue my embroidery, as my family and friends are requesting some designs on their own t-shirts and jeans! The positive feedback I received every week from my peers was also encouraging. Overall, I really enjoyed this assignment and I would encourage others to take this class so they can not only learn new technological skills but also a new skill of their choosing! If you would like to keep seeing my progress with embroidery you can follow my Instagram account called "haileysembroidery".
0 Comments
I love Dunkin Donuts. I prefer Dunkin Donuts over Tim Hortons and Mcdonalds, which is unfortunate because we live in Canada! I was lucky enough to be able to go to Orlando Florida right before COVID-19 shut everything down. Of course, I ate/drank a bunch of Dunkin Donuts and life was good. So, as I was thinking about what I wanted my next project to be... I was inspired to do the Dunkin Donuts logo. This weeks project was a lot more challenging than my previous projects. I used a brand new stitch called the "satin stitch" that I learned from a YouTube video by an embroidery channel. I started off with the basics of tracing my design onto a piece of paper and piercing tiny holes with my needle all along the outline. 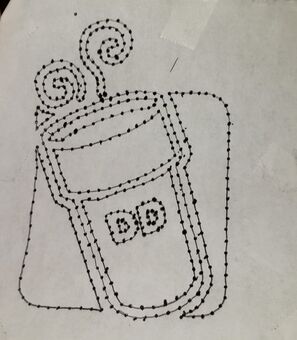 The next step was to pin that piece of paper onto the exact spot on my hoody. I do this so that I can dot with a marker in the small holes so that my outline shows up onto my hoody. This process always takes me quite awhile.  The next step was to begin embroidering. I bought this plain sweater from a local store here in Moose Jaw so that I could embroider my design onto it. The fabric of the sweater was unfortunately very thick, so it was super difficult to pierce the needle through each time. Because of this, it slowed the process down substantially. I began this project on Saturday June 7th, and I just finished it yesterday June 12th. I worked on it for at least 3 hours every day throughout the week and really struggled with it. 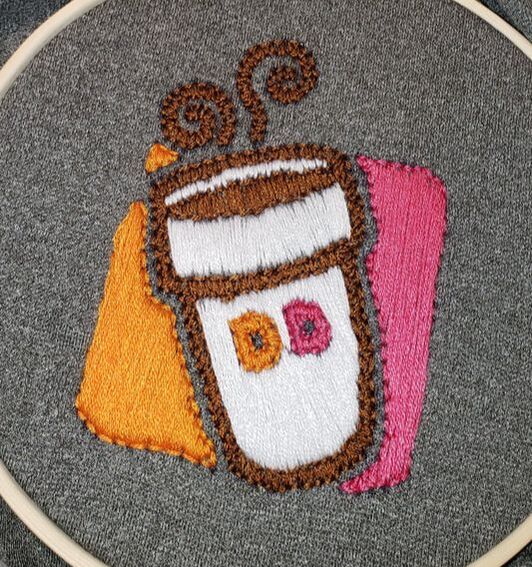 The above photo is my end result and I am extremely happy with it! The satin stitch that I mentioned at the start of my blog is the stitch I used to fill in all the outlined spots with colour. The pink, orange, white and brown chunks that are all filled in were done so using the satin stitch. It consists of poking the needle through the top of your desired area you want filled in, then pulling the thread down and poking the needle through a spot on the bottom. It should be a straight, tight line once you have pulled the thread through.
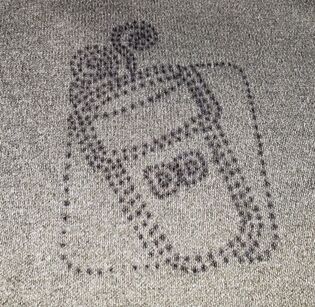
The struggle with this stitch is keeping your thread very tight. If you loosen it up, there will be gaps in the colour that would be super noticeable. I am amazed at how long this weeks project took me to complete, but I am very happy with the end result! My friends and family seemed to like the final product as well. Hello all, and welcome back to my embroidery journey. This weeks project was rough. I struggled a lot with it and I am still not 100% pleased with the outcome, but it is all about learning from mistakes and moving on. I came across this TikTok linked here, as I was scrolling through before bed, like I usually do. In the video the girl traces her design onto a piece of paper and then attaches the paper to the shirt to follow the outline on there. When she is done, she simply wets the paper and peels it off, revealing her design. I thought "wow, this could be truly revolutionary". The next day, I found a design that I fell in love with and wanted to try immediately. 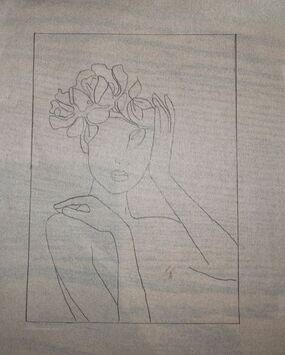 I traced the photo above onto a piece of paper and began puncturing small holes on the outline as a guide for my needle. I was so excited! Then, I had to pin the picture to my shirt and place the hoop on my shirt to hold the fabric tight. 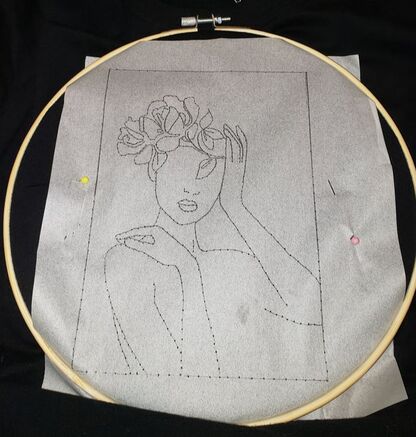 Once it was all set up, I began embroidering. I did the border and her body with white floss. Her lips a magenta pink, the leaves a light green and the flowers a light pink. It was all starting to come together. I thought if this really works, this might be my new method for embroidering the harder designs that I have been struggling with. I used a simple backstitch with the stab method that I learned from this video linked here. Once my masterpiece was done, it looked so good. I had perfectly straight lines with good stitches, now it was time to wet/peel the paper. 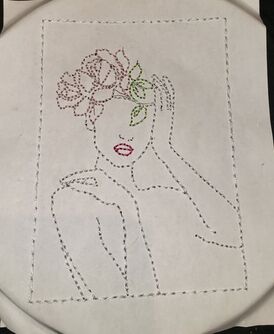 When I began to peel the paper, the problems began arising. The paper I had used was far too thick to peel off without loosening my stitches. Which, of course, I did not know when I began. I kept wetting it, and wetting it, crossing my fingers and hoping for a good outcome. When all the paper was peeled off, it looked horrible! I had stitches falling out everywhere and was completely disappointed with the outcome. 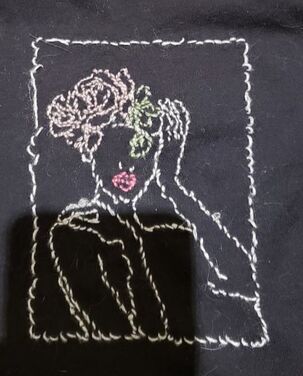 I began reading the comments on the original TikTok and discovered that some people had suggested using a type of paper that instantly dissolves when it comes into contact with water. A lot of people have used it for embroidery. I started to search for the paper on Amazon and found some! I ordered it up and it came relatively quickly. It is called "Smartsolve Water-soluable Translucent paper" pictured below. I wanted to try this design again as I really liked it, this time with the soluble paper. I peeled out all of the stitches on my shirt in order to start again. 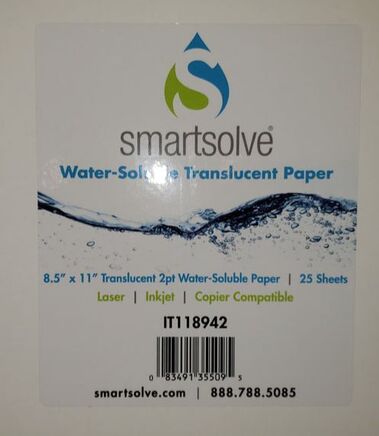 I used the exact same method. I traced the photo onto the paper and then pinned it to my shirt with the embroidery hoop on top. I was hopeful, yet again, that this time would truly work. I spent about 4 hours embroidering it the second time from start to finish. The only problem with the soluble paper is that it is extremely thin and rips very easily, so it did take a bit longer because of that. When I was finished, I put the shirt in the sink filled with water and watched the paper quickly dissolve, leaving behind my design. I was much happier this time around. 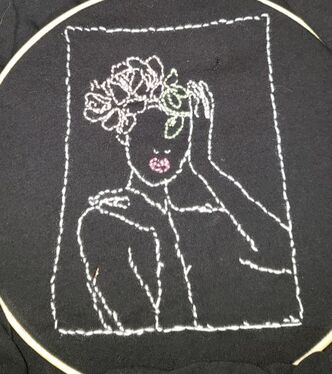 The picture above is the final finished product. As you can see, there are a few misplaced stitches, but overall I am happy with the outcome. This weeks project really discouraged me, as I thought I maybe wasn't capable of embroidering. I did not give up even when I had to completely redo my design. It was definitely a challenge, but I am still looking forward to next weeks project.
The lesson learned here is that I need to do more research before I start my projects instead of simply going off of a TikTok video, without reading the comments. Hello! This week we were supposed to use a new technological tool to help us display our learning project. The tool I chose to use is called Adobe Spark. It is a super user friendly video creator website that I really enjoyed using. Right when you go to the website it is going to ask you to make an account so you can save your progress, it is free! I signed up through my FaceBook. Then your home page should look like the photo below... 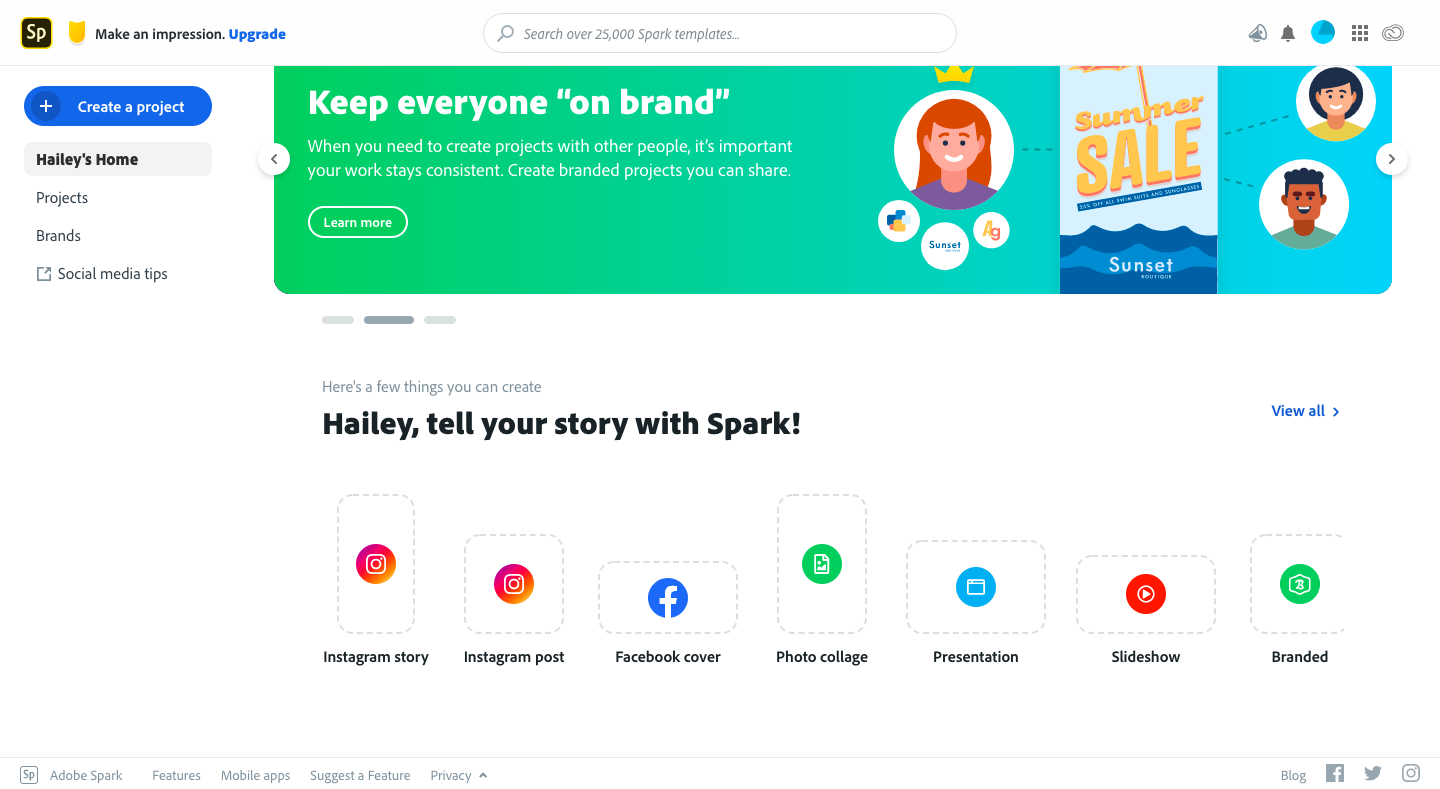 The next step is to start creating, there is a button in the top left hand corner of the page that says "Create a project" you are going to want to click that to get started. The picture below is all of the options you can create using Adobe Spark. 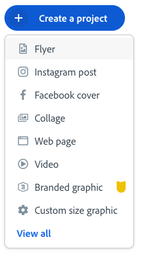 I created a simple video. The next step is to name your video and then pick a template! After that you can add your own photos/videos. Before you begin adding your own content, a tutorial pops up that shows you how to do everything! 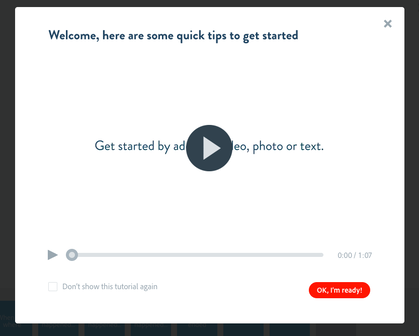 You can change the music in the background to whatever you want and it was super easy to access my photos because I just opened google drive and all of my photos were there. After my video was finished, I downloaded it to my computer and then uploaded it to YouTube! I really enjoyed using this website to create my little video and I would definitely use it again. It was super user friendly. Checkout my video below!!! For this weeks embroidery project I did not have a lot of time as my Sociology class is taking up a lot of my free time. But I still wanted to create something new and have fun with it! I am not sure how many of you have seen the "you're cute jeans" video from Keeping up with the Kardashians. It is a short clip between Kendall and Kris Jenner where Kris compliments Kendalls jeans and says "those are cute jeans" to which Kendall replies "you're cute jeans" as a joke. Kris did not understand what Kendall was trying to say and it has become a universal joke now. I have posted the video below so you can understand what I am trying to explain! My sister and I always say "you're cute jeans" back and forth to each other, so I thought, why not embroider it onto a pair of jeans! 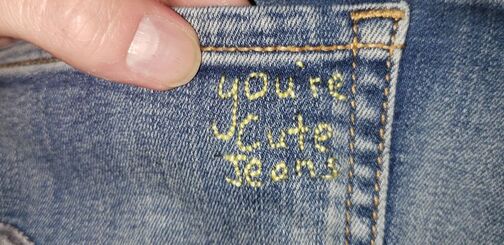 I wrote out in pen "you're cute jeans" to give myself direction when embroidering. I did this on my left back pocket on a pair of jeans and I used a simple back stitch! It took me about an hour to do as the lines had to be fairly small in order to get a curvature. I am happy with the way it turned out even thought it may be small. I wanted to do this because I enjoy embroidering and I thought this was kind of funny! I hope you enjoy it too.
I embroidered a little bit before I started this class. I got a huge kit on Amazon that came with 150 different colors and got to work! I embroidered two pairs of jeans for myself and my best friend, a t-shirt with the movie cover "Call Me By Your Name". This week I was scrolling through the app "TikTok" and came across a video of a girl embroidering a Volkswagon van with flowers on top. I knew that it was going to be my project for this week. So I googled up pictures of Volkswagon vans and started tracing it onto a piece of paper. I then taped the paper to my shirt and poked holes all along the drawing with my needle. 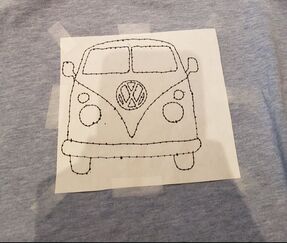 After I got all the holes poked through, I began dotting through the holes onto the shirt with a thin tip sharpie, so I could get my outline.  Next, I began embroidering. I used a simple back stitch for the outline of the van with black thread and then for the headlights I used white thread, same stitch. For the flowers on top I used pink and yellow and used what is called the lazy daisy stitch. A really nice stitch for doing flowers. I am really happy with the way it turned out and look forward to embroidering more as the weeks go on! 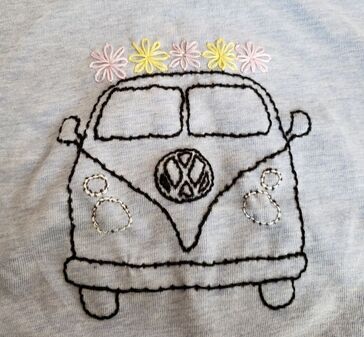 Hello and welcome to my learning project blog! For this assignment I have chosen to tackle embroidery as my new skill. I have always wanted to try embroidery and now I finally have the opportunity to do that. I will be starting with embroidery basics and learning simple stitches. I will be using YouTube as my main platform to learn new skills. But, I have also seen quite a few neat ideas on TikTok for cute embroidery ideas that I would like to try! As I said, I am going to be starting with the basic stitches and finding my favorite one. I will post the video I found on YouTube to start below. I am very excited about this and I hope it goes well for me! |